Translate

Thursday, February 16, 2017

I finished a Crazy Quilt Block ~

Thursday, February 16, 2017


There you have it, I finished another of my crazy quilt blocks I started in Kathy Shaw's Crazy Quilt Classes.  It is a finished 12 inch block that is framed in one of the many fabrics I used within this block.


 I then created a quilt block storage portfolio carrying case in which to store my crazy quilt blocks; this is a portfolio I learned from Ellie Sienkavech (sp).  This dimensional crazy quilt block I used includes embellishments like Silk ribbon embroidery as well as using assorted thread weights and fibers. A beaded opal carbachon in the top left corner, a beaded monogram in the lower right, and some wisteria stumpwork along the bottom left with french knot sheep on the hillside.  The top right corner is a beautiful silk ribbon variagated ribbon in pastel colors for the petals and the seeded center of the flower is filled with glass beadwork.  Assorted embroidery stitches including many bullions, some very tiny, are part of this piece. 

At the center is a vintage photo printed on silk I purchased from Kathy Shaw, thank you Kathy. It is framed in a braid that I have attached tiny glass beads throughout the braid.  The handle allows me to not only carry the blocks with me, but also allows me to hang the portfolio up that this framed block can then be on display.

In this second photo is the back that I used a beautiful bead that sparkles and a corded elastic to close the flap; on another portfolio I used a heavy duty magnet and then attached a flannel rabbit motif to cover the magnet brace.  When you open the flap there are side fabric panels that unfold displaying any crazy quilt blocks in storage.


These flaps not only hold the blocks in place they also help to keep the blocks clean while in storage awaiting completion or for use in the next project as well as keep the blocks flat preventing wrinkling of the block. One portfolio will hold multiple blocks.  I have another one of these storage portfolios for my pieced quilt blocks and have yet to make one more for my Baltimore album blocks.  


I love stitching in the garden on the blocks and creating birds and bees and butterflies twirling about on those long winter days we experience in the north.  With another 6 inches of fresh snow that fell last night, totaling over two feet of snow in a weeks time, stitching flowers in the garden in between shoveling helps me recoup my strength for the next snowfall as I enjoy sitting by the fire.

fresh new snow that fell while we were sleeping
Maybe this weekend if the sunshine appears again we will have a chicken barbeque on the grille and enjoy the brilliance of the glistening snow as I imagine which garden flowers will be the first to appear as I await Springtime in New England.

Godspeed, and thanks for reading my blogpost ~ Hope all is well with each of you
mary 

Monday, May 16, 2016

Registration open...

May 16, 2016

Quilters are in for a real treat
Shawkl has a "new" class
Registration open until Tuesday May 18.

Hello fellow quilters!  Have you been looking for a class to take?  or someone new to learn from?  Looking to make projects small enough to complete so you don't increase your stash of UFO's? 

My Crazy Quilting mentor, Kathy Shaw, is doing something totally new for us in blog land classes.  She is hosting a "traditional quilting" class where everything is done within a private blog from your computer.   No classes to drive to, you can do your assignments at your own pace.  And get this... she teaches them to her students for "FREE".  I know... almost unheard of today :)

Her name is Kathy Shaw and she is one of the "BEST".  Kathy is devoted to her family, an Author, and even has taught in college.  She encourages her students, will critique your work, and finds creative ways to help you learn something you may not know how to do, over the internet with words and photos, and for the one that may get stuck on an assignment or technique, she has been known to phone call you to help walk you through it...  I know - isn't that ever so kind.

You can chat with other quilters from around the world, how cool is that :)  You have access to see other gals projects too, as you encourage and inspire one another with your words and work.    If you are a self starter, as you need to work at your own pace and want to 'learn' some tips and techniques that may be new to you, or to have a refresher on some things you thought you knew but after class is over you now know better, and have fun in a quilt group from your own home you may want to register.  

You will need to know how to use a blog and upload photos.  You also may want to acquire a 3 ring binder, as Kathy's classes in the past are full of PDF's she allows you to download and print for personal-use-only so the learning continues as you complete each new assignment.

Today is Monday morning, and registration is open through Tuesday May 18 at Midnight Alabama time :)   Kathy Shaw is from the south in United States of America, alas, with blog-land we miss out on her accent (if she has one), but we get to enjoy her southern hospitality as she welcomes us into her home and life for the few months over the course of this class.

 I registered as soon as I saw class with Kathy was in session once again!  Maybe see you in class. Read more about it at the following link...

http://www.shawkl.com/2016/05/open-registration-for-new-class.html

Godspeed,
mary

Thursday, March 17, 2016

Crazy Quilt Class Registration is OPEN ~ through March 18

If anyone is interested in learning how to create crazy quilt blocks from a Fantastic Teacher, my CQ teacher Kathy Shaw has opened her online class once again.  And get this, she teaches it for free, as she loves crazy quilting and wants to share the joy of crazy quilting with each of you.

Registration is open for such a short time, here is the link to get registered.
http://www.shawkl.com/

Happy Quilting Everyone ~

Monday, February 29, 2016

February ~ time to display Hearts and Feathers

Oh how I enjoyed creating this Valentine Celtic Hearts and Feathers quilt in the Free Motion Quilting Technique on my home sewing machine.   I created this quilt following online instruction from quilter Leah Day.  

I loved it so much I made two of them, and gave one to my oldest daughter.  It was a delightful surprise when I went to visit her earlier this month,  to see her quilt was hanging and part of her holiday decorations on her front door.  Oh, I should have taken a photo of her door.   I will have to ask her to do that and send me one to post.

Thanks Leah, still enjoying this quilt I made with you some time ago.

Monday, October 12, 2015

A finish from Kathy Shaws class

I am so excited to have a project finished and hanging... it has been sometime since I last posted.  

I have been taking Kathy Shaws Crazy quilting classes on the internet; I am a newbie crazy quilter having only dabbled a bit creating few crazy quilted projects before meeting up with Kathy.  I hope you are inspired and maybe even encouraged to try this art form of needlework so I will share with you what I am learning. 

The first photo is of a practice piece of muslin I created from her dyeing classes; I believe we were using acrylic paint turned into dyes for this piece....  I have to tell you my dyed fabric pieces did not look like anyone elses in the class and boy I wondered where I would take this piece of fabric...


The second photo is taken in my backyard by a yard decoration set-up I created for our 5th annual Fanslau Family Fun Fall Festival.  This huge pumpkin is a table painted orange and the green stem is a gardeners/prayer warriors kneeling pad.  The framed project is from Kathy Shaws class 107 on silk ribbon embroidery of small gardens; again this is my practice piece I learned silk ribbon embroidery on .... I put the two assignments from class on the one piece of work and of course added a few extra details like a village with a church, mountains, lighthouse, waterfall and gristmill, pathways, etc.   I wanted to include critters and such, but it is time to take another class, so calling this one completed, maybe I will include some novelty pins later on.  I learned so much about what to do and not to do while working on this project...


The third photo is the framed piece hanging in my home; the dimensions of the project inside the navy blue border is  10  1/2 inches high x 11  1/2 inches wide piece.... hmmmm, pretty happy with this practice piece and thought I would share it with all of you - hope it brings someone a little bit of inspiration and encouragement to give these classes a try.  Learned so much from Kathy Shaw... so grateful Kathy for your investment in me with these art forms, classes and encouragement.


Now a note about Kathy Shaw... one lovely generous lady who has learned these art skills with a hearts desire to pass on her knowledge to others...  check out more about Kathy Shaw on her blog...

Godspeed,
mary

Wednesday, July 15, 2015

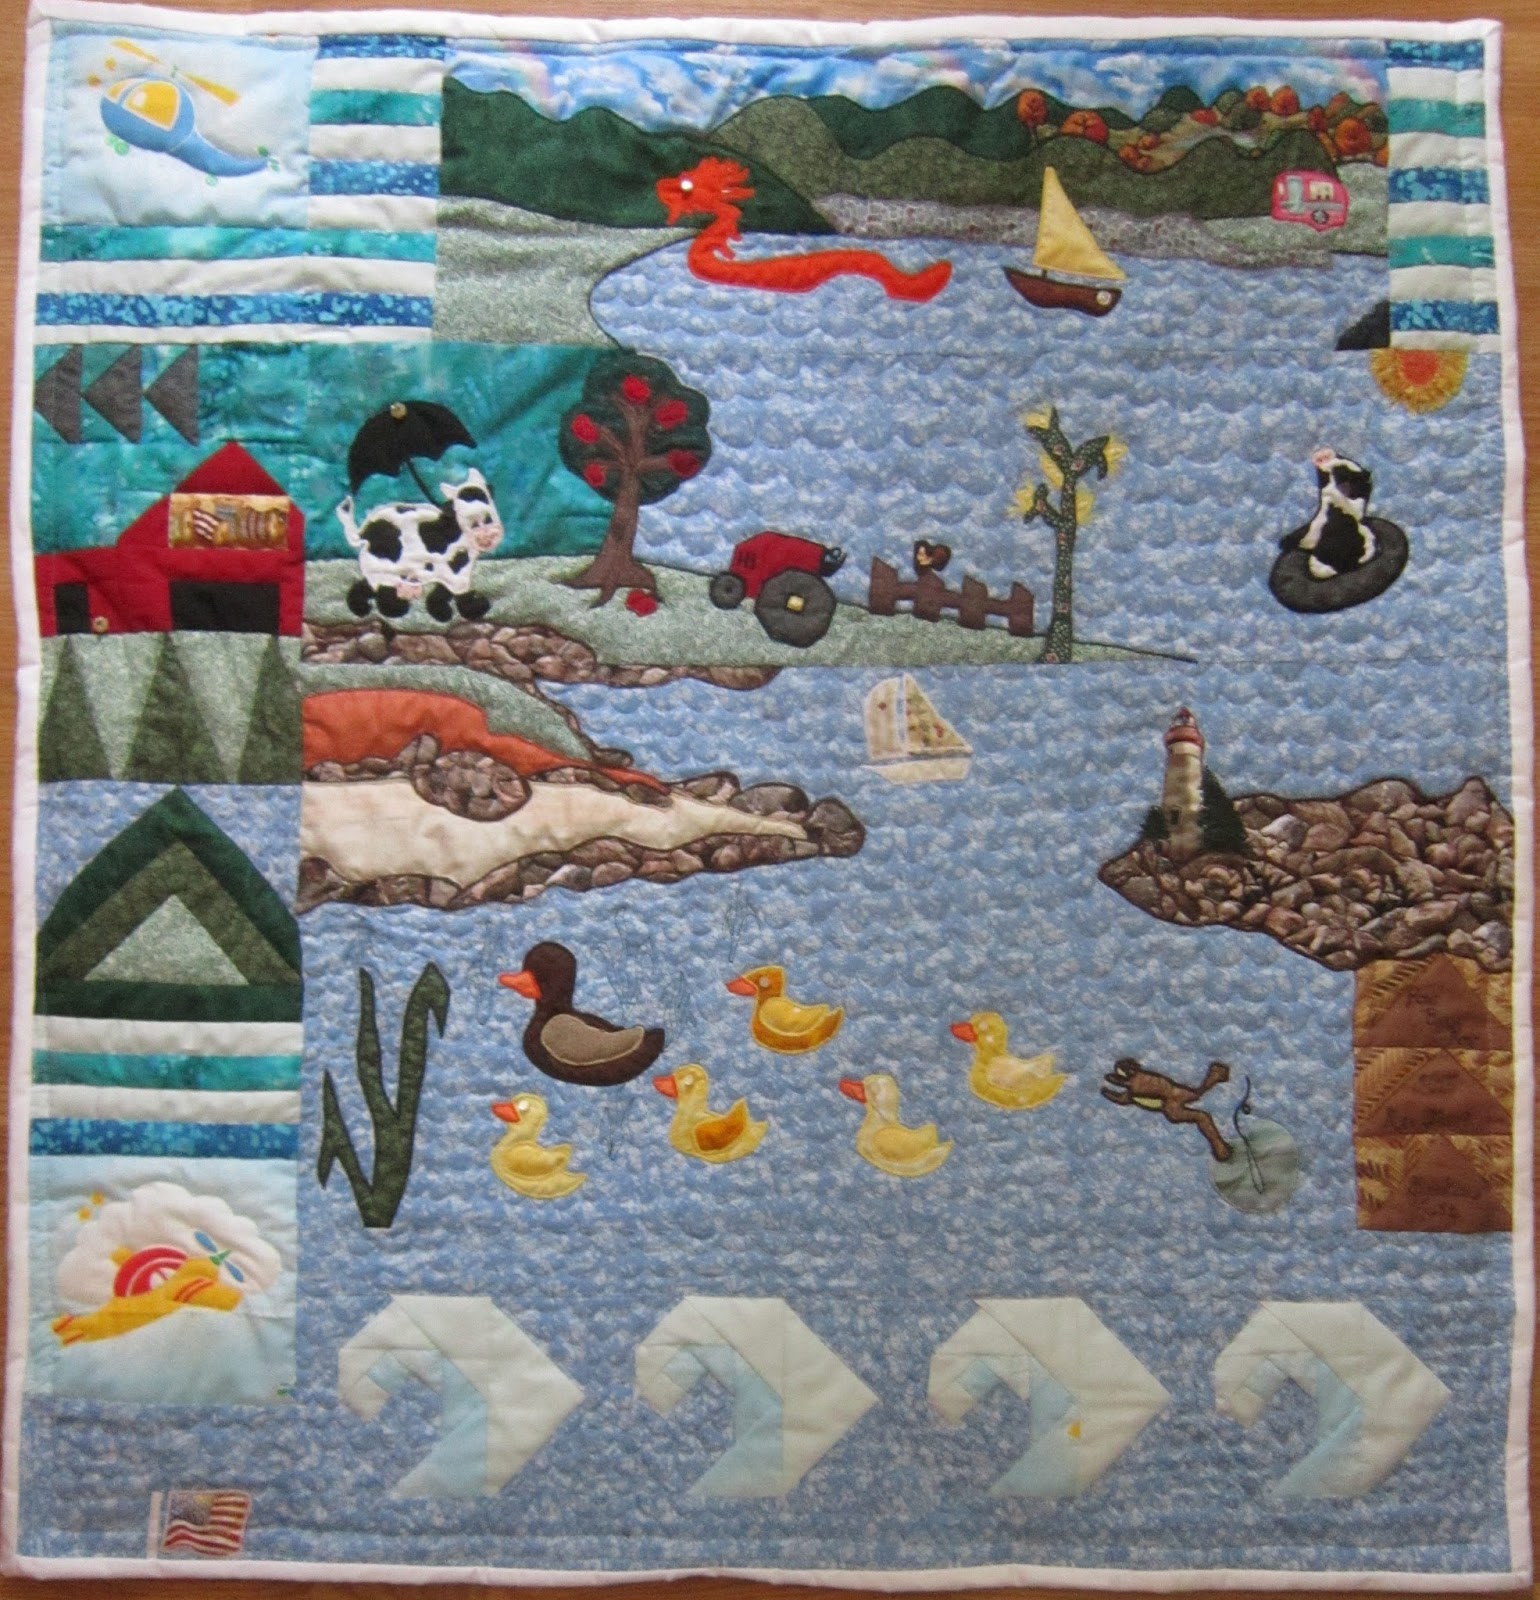
Grandson Quilt ~ Row by Row

Grandson Quilt Front ~ row by row
 
 
Grandson Quilt Back

      This quilt was made in July 2015 as part of the Row by Row Challenge in the USA and Canada.  Participating Quilt shops are giving away a free pattern (row), you collect as many patterns as you like and create a quilt, row by row.  you must use at least 8 rows.  If you are the first person to bring in a completed, quilted, bound, labeled, quilt to a participating shop you win a prize. I won a fantastic prize from the Golden Gese Quilt Shop ~ thank you so much, I love all my new fabrics :)

      I finished binding this quilt last night, and so excited to share my quilt with all of you.  I used the 11 rows I collected from different places, 10 from USA and 1 from Canada.   My husband and  I enjoy our visits to new quilt shops and I love making purchases of some fine fabrics to bring home.   All the blocks I chose are things our two grandsons ages 3 and 4 enjoy like fishing, tractors, and dragons (in Lake Champlain )  .   It is a two sided quilt, 5 rows on the front and 6 rows on the back.  

Monday, June 29, 2015

2015 FMQC June Pillow with Diane G

What a fun time I had creating this months free motion quilt challenge!   The teacher this month was Diane Gaudynski and I found loads of inspiration within her 2 books.  


My fabric choice was a special piece I recently received from my aunt.  She sent me a box of old handkerchief linens that she has had for years, and what a delight I have had going through them.  


This green one I thought would be perfect for a FMQ feather design, and I have been eager to try Diane's ideas for feathers coming out of a vase.   The white stenciling on this antique linen gave a fantastic design element to work around :)
My finished Pillow Cover , now to go stuff it


My finished Pillow


Side view shows the lovely stenciling (or maybe this shape was covered with something, then dyed).
 ~ Thank you Auntie for all the lovely handkerchiefs.   As you see one has become a little quilted piece, others will go in my collection, and others still will become part of Crazy quilting or a part of free motion quilt blocks.

~ Thank you Diane for inspiring us through your works and teaching.

~  Thank you quilt shop gal for creating this challenge for us to be a part of.

Godspeed,
mary


Monday, May 25, 2015

2015 FMQC May Pillow with Cindy N

May Pillow - More photos to come in daylight hours :)


Lots of "POP" with Scribbling Technique... check out those dinosaurs...
Used my new "Ultimate Stencils" from Cindy Needham 
Daytime photo
By the window in the daylight really shows the dimension


What fun I had with the May Pillow Challenge!   Cindy Needham was our instructor, and this months class was a great opportunity for me to try out my new stencils my husband purchased from Cindy for me for Christmas ~ WOW ~ that was such a surprise!   Way to go honey.  Loved how easy the "Ultimate Stencil" made for creating this star.

This month I would be creating the fourth bed pillow for one of our grandchildren for sleepovers at Mimi's house.   This grandchild loves star gazing with Mimi, so I thought a nice BIG star in the center was a good place to start and I would finally try out my new stencils.  

When I told my grandson about his special pillow, and the star I had placed in the center, he was very happy, and thought maybe Mimi could include some planets, and while I was at it, a dinosaur on the planet earth would be a good idea, Heehee, he is only 3 :) 

Well, I took his inspirational ideas, and created four circles with a celtic type over/under that connected the circles to the original golden star within a circle I quilted.  I then stitched inside the four small circles my take on what some of the dinosaurs might look like ~ stitching them in green threads.   Then I began the echo stitching around everything in white thread to match the fabric, and thought two go-arounds of echo quilting would be better than just one....


Lots of Sunshine and Shadow, now to rinse blue marks then heat erase the frixion pen marks

Once the echo quilting was completed, I then did scribbling for the background, a technique that Cindy taught in her Craftsy class, "Design it Quilt it.   Love that class ~ Cindy is the best Free Motion Quilt Teacher.     I own a copy of her first published book, and I am blessed to have her self-published books that she updates yearly, and I have been in her classes (in person) when she was teaching at the Vermont Quilt Show, and I have a set of her recently released "Ultimate Stencils" ~ square and circle, not to mention I watch her on the quilt show  (she has done two episodes now), and follow her blog.

Pillow on the sofa


Thanks Cindy for being such a great teacher and an inspiration!   I have enjoyed this second Quilt Challenge Darlene has hosted with you as our instructor ! 
Next sleepover we will make a pillowcase

Thanks Quilt Shop Gal :)   You help keep me stitching when I am not playing with those 4 grandbabies under 5 :)  Next time each grandchild is here for a sleepover, we will go through mimi's fabric stash and let them pick out fabric for a pillowcase for their special pillow and have another sewing class time together.

Godspeed,
mary

Sunday, May 17, 2015

102 E ~ polish, markers, watercolor pencils

The Finish of class 102 E
 
Polish, Markers, and Watercolor Pencil
 
What fun I had with these household items
 
Thank you Kathy for stretching my creativity!   By utilizing items I already had in the house, and then changing the color on the object I was multiplying my stash and now have a larger rainbow of color to work with  :)
 
My dear husband purchased me these gold thread charms.  I was including them in cards to my stitching friends.   Now with a small bottle of nail polish I can color code the thread to match the notecard or include it in my block :)  The bottom shapes are brass colored metal, not charms but have these points on the bottom you press through the fabric and then bend the points over.  As you can tell I am unable to come up with the word at the moment.


Here are the photos of my silk ribbon flowers and butterfly, first in the white silk ribbon on a piece of white muslin, then I color changed them with Sharpie ultra fine tip markers.   Love the change, and the fine tip helped keep it off the background!  I can see in the photo that the lifting tool I used was a little to large and made tiny holes in the muslin that I now need to go and brush the fabrics fibers and pull on the bias, and they will disappear.


I can only imagine the pretty gardens can now have in my future...
with or without weeds, my choice :)
 
And the Final element of class was this beautiful little lady under the umbrella.   This is Kathy Shaws design, that we were to print via an inkjet printer, which I am unable to do.... so to accomplish this class I enlarged the drawing with a photo copy machine, taped it to my window, and then taped a piece of muslin on top.  I then traced the image onto the muslin.   Next I removed both muslin and paper from the window, and turned the muslin upside down and taped it again to the window so the light from outside would highlight the pencil marks enough so I could see where I was to color.  
 

I then took out my watercolor pencils and proceeded to color in the lady.  With 12 colors to choose from in my pencil box, I then played with blending and shading and designing fabric.  I chose a plaid basket weave type of design for her dress and hat, and solid for her ribbons and shawl.  The umbrella too was colored to go with her outfit, and you can see the shadow of the other side of the umbrella through the design. 


When enough color had been added and I got a good feel for the design, I removed from the window and hooped my little lady.   I first put down one layer of plain muslin, and then the colored layer on top before hooping.   This extra foundation will help support whatever  embellishments I am going to include.   I then added a bit more color, now that the light is not shining through, and dry brushed to further blend the colors. 


Once completed with pencil I then began to embellish with threads and ribbons; French knots on her hat are created from hand dyed silk ribbon made in an earlier class.   I have my little lady still hooped, and over time as the ideas come I will embellish her further and eventually hope to include this lady in a crazy quilt project.


Thank you Kathy for investing your time and talents in me that I could learn these skills from you to apply to my art work.   This little lady on a piece of muslin with some color and thread and ribbon, well the possibilities are endless if you can draw and color, you can create it.   I appreciate you and what you do for all of us ladies.


Tuesday, May 12, 2015

Procion Dyeing Class


Fun Day Procion Dyeing Class:)

Learning so much from Kathy Shaw in her crazy quilt classes!  Thank you Kathy.  So many of these tips and tricks we are learning can also be applied to all sorts of sewing and crafting projects.  Right now I am collecting white cotton t-shirts so this fall I can make family / team shirts for game time at our annual family fun fall festival!

The first part of this class was preparing the soda ash water for soaking the fabrics and trims that prepares the fibers for absorbing the dye.   I used a gallon pickle jar and set it in my sink on top of an old sheet/dropcloth.   Once the water and ash are mixed in the hottest temperatures, I added the materials... I packed the trims on the bottom so they would get saturated, and then I packed the fabrics in tight as I wanted to get a mottled look to the fabrics.  I then wrapped the jar in the fabrics and it kept all items warm for more than an hour.


I then labeled my jars for primary and secondary colors, and began the mixing process, using both my mask and gloves during the processing.   This time I created some beautiful soft shade of green, turquoise, and a nice yellow and fuscia.  


While I was waiting for the hour to pass for the soda ash soaking, I painted a few pieces of lace.  The colors are harsh, but the butterfly when rinsed came out pastel colors which are  so pretty.

 
I submerged ribbon, bias tapes, fabrics, embroidery threads and then last dyed wool pieces.   I now have beautiful silk ribbons for embroidery, some pretty color perle cotton,  fabrics that will be fantastic as skies, and wool that I felted from an old white sweater earlier this year, well, now it is an assortment of pretty colors ready for projects.  These photos are well rinsed and "wet".


The Finish
cotton eyelet on left silk ribbon and perle cotton on right
the blue and pink in front are linen
The stack behind is cotton fat quarters
and the lace were both painted with same dyes, one washed out pastel the other stayed bold

These two pieces did not take the dye at all
they must be polyester?  hmmm

Friday, May 1, 2015

2015 1 Fun Day Dyeing

~ Dyeing Class with Kathy Shaw ~
 
Enjoyed my class time today learning the process of dyeing lace, binding, rattail and cotton cording, and other items.   Enjoyed the learning process and so grateful for Kathy's teaching and organization.   We spent the first few classes in preparation which was so beneficial to not only success but also aided greatly in keeping things clean and free from dyeing accidents.  Thank you Kathy for all your organization of our materials for this class, it helped immensely. 


Todays class I am using an acid dye, the brand RIT, and here you see I have prepared 3 quart jars ready for the prepared acid solution.  I found this brand of dye did not dissolve as well as I would have liked and was concerned about the fabrics I was dyeing to be left with specks of dye, so I filtered the dye.  The yellow and red I filtered through a coffee filter, and the blue I filtered through a piece of white muslin fabric, which I later immersed in some dye to later be used in a project.  I then stored the filtered primary colors in the three juice bottles on the right in the photo of all the dye colors.  Those little juice bottles made it so easy to pour the colors into the spoons when measuring the solutions.  I used an empty vinegar bottle for mixing my acid dye solution in for easier pouring when measuring amounts.


My favorite of the colors were the light tertiary blends we created.  They created the prettiest ribbons and bias tape, as well as painted up nicely on the lace motifs and trims.   You can see I kept the instructions handy for each step of the way.
 

The following two photos are my items I put through the acid  dye baths while they were still wet; I included some identification marks so I could remember which ones the pieces came from.  I really liked 4 D,E,F colors.  Notice the 3C and 3 E created a pink color, instead of red, I think it is because of the poly in both those trims.


And the following photos are my laces, bias tape, cording, rattail, and fabrics all dried and ready for the iron or to use as is.


One thing I struggled with was keeping my rubber gloves clean enough to not stain the pieces with dyes that I didn't want that color on, if you look closely at the bias tap and the silk ribbon a few areas have been over-dyed :)  

My other problem was I ended up with no green colors.   I think the filtering of the dye, although no speckling of fabrics, it did mean less pigment, so my yellow blue combo was more of a blue than green.  

The other thing I noticed on my silk ribbon, I dyed one in the primary blue and one in the filtered blue and they are both different colors; one is a deep blue/purple and the other is a very pretty lavender - the last two ribbons in the second column of my silk ribbon rows.

I was so happy to find the poly lace took the dye (Pink Lace) and the rattail cord also a poly/rayon took the dye as well, not to mention how excited I was to find the bias tapes I can now have in whatever color I can create!  

I am now ready to go on to the next assignment.  And another time I will play with my other powdered dyes.
 

Thank you Kathy, had loads of fun, learned so much, and now have a bounty of pretty colors to use in my next projects.