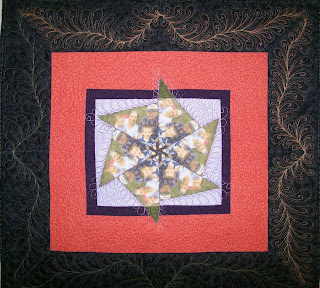
I have finished my FMQ KK Bonus quilt and I have had so much fun making this quilt as I tested out so many of the new techniques I learned on the internet. Thank you Teri Lucas and Jeanne Sumaltro for the KK tutorials on how to turn my photos into a kaleidoscope in the shape of a pinwheel. Thanks Ricky Tims for the Grand Finale DVD access, I tried some of your trapunto techniques on the pinwheel and feathers around it. This was a playtime learning quilt. Thanks SewCalGal for the FMQChallenge!
In this first photo I had FMQ the feather border in Rayon green thread using techniques I learned from Patsy Thompson in our FMQ December tutorial. Love how symmetrical it looks and the only mark I had to create was the spine of half of one border, and that one pattern was later was used to complete the feathers on the whole quilt border. I used a soap sliver for marking just the spine which meant NO MARKS TO FUSS WITH REMOVING. LOVE THIS PART.
In this photo I was trying to decide which thread would look best for high contrasting hyper feathers! Cindy Needham had showed me this trick about just unwinding thread right on your project! The thread colors are always lighter off the spool so choose a color one or two shades darker than you might think you want.
This photo shows half the quilt in green feathers, while half is hyperquilted ! What a difference. To cut down on the thread build up in the spine, I first did the hyper quilted plume, and then filled with the swirl inside before hyperquilting the next plume. Love the look and not too much threadplay on the spine.
In this photo you can see the entire border is hyperquilted... next step is the threadpainting and scribbling in each pinwheel.
I made two of the pinwheel blades go outside the first border using a green fabric similar to what was in the photo. I then shadowed the grass behind each person on each blade making the people in the trapunto area pop right up! I then did some threadpainting I learned from Nancy Prince on TQS and then followed up with some dense scribbling. In the very center I attached a button and bead connecting all the spokes of the pinwheel together.
In this photo you see a closeup of the feather border, but also note the couching in the binding. This was a technique I learned from Libby Lehman in a special DVD she had on the TQS show this fall. I loved trying this out. You attach the binding from the front, then fold and press in place and then she had some great techniques for working with the couching, and as you zigzagged over it to hold the couched thread in place, it also stitched the back of your binding AT THE SAME TIME. No handstitching! I also chose to use a black thread to couch with, as I like how it gave the thread some texture, and it also toned down this orange color! I used a great technique I learned from Leah Day on how to attach the ends of your binding. It works great and closes the ends on the diagonal, no bulk in the seam.
You can read more about this quilt at http://cantstopstitchin.blogspot.com/2013/01/fmqc-bonus-tutorial-kk-dvd-teri-lucas.html
Godspeed,
mary


Beautiful Mary. I love it. You did a great job. Fun to incorporate insights from a variety of FMQ Experts. Hmmm....seems like this would make for a great challenge!
ReplyDeleteSewCalGal
www.sewcalgal.blogspot.com
What a beautiful finish! I especially love your couched binding technique and those hyperquilted feathers!
ReplyDelete