Translate

Tuesday, May 12, 2015

Procion Dyeing Class


Fun Day Procion Dyeing Class:)

Learning so much from Kathy Shaw in her crazy quilt classes!  Thank you Kathy.  So many of these tips and tricks we are learning can also be applied to all sorts of sewing and crafting projects.  Right now I am collecting white cotton t-shirts so this fall I can make family / team shirts for game time at our annual family fun fall festival!

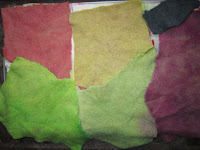
The first part of this class was preparing the soda ash water for soaking the fabrics and trims that prepares the fibers for absorbing the dye.   I used a gallon pickle jar and set it in my sink on top of an old sheet/dropcloth.   Once the water and ash are mixed in the hottest temperatures, I added the materials... I packed the trims on the bottom so they would get saturated, and then I packed the fabrics in tight as I wanted to get a mottled look to the fabrics.  I then wrapped the jar in the fabrics and it kept all items warm for more than an hour.


I then labeled my jars for primary and secondary colors, and began the mixing process, using both my mask and gloves during the processing.   This time I created some beautiful soft shade of green, turquoise, and a nice yellow and fuscia.  


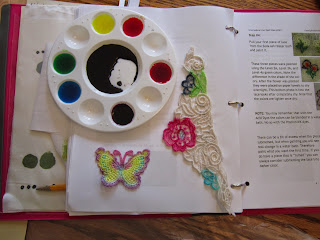
While I was waiting for the hour to pass for the soda ash soaking, I painted a few pieces of lace.  The colors are harsh, but the butterfly when rinsed came out pastel colors which are  so pretty.

 
I submerged ribbon, bias tapes, fabrics, embroidery threads and then last dyed wool pieces.   I now have beautiful silk ribbons for embroidery, some pretty color perle cotton,  fabrics that will be fantastic as skies, and wool that I felted from an old white sweater earlier this year, well, now it is an assortment of pretty colors ready for projects.  These photos are well rinsed and "wet".


The Finish
cotton eyelet on left silk ribbon and perle cotton on right
the blue and pink in front are linen
The stack behind is cotton fat quarters
and the lace were both painted with same dyes, one washed out pastel the other stayed bold

These two pieces did not take the dye at all
they must be polyester?  hmmm

Friday, May 1, 2015

2015 1 Fun Day Dyeing

~ Dyeing Class with Kathy Shaw ~
 
Enjoyed my class time today learning the process of dyeing lace, binding, rattail and cotton cording, and other items.   Enjoyed the learning process and so grateful for Kathy's teaching and organization.   We spent the first few classes in preparation which was so beneficial to not only success but also aided greatly in keeping things clean and free from dyeing accidents.  Thank you Kathy for all your organization of our materials for this class, it helped immensely. 


Todays class I am using an acid dye, the brand RIT, and here you see I have prepared 3 quart jars ready for the prepared acid solution.  I found this brand of dye did not dissolve as well as I would have liked and was concerned about the fabrics I was dyeing to be left with specks of dye, so I filtered the dye.  The yellow and red I filtered through a coffee filter, and the blue I filtered through a piece of white muslin fabric, which I later immersed in some dye to later be used in a project.  I then stored the filtered primary colors in the three juice bottles on the right in the photo of all the dye colors.  Those little juice bottles made it so easy to pour the colors into the spoons when measuring the solutions.  I used an empty vinegar bottle for mixing my acid dye solution in for easier pouring when measuring amounts.


My favorite of the colors were the light tertiary blends we created.  They created the prettiest ribbons and bias tape, as well as painted up nicely on the lace motifs and trims.   You can see I kept the instructions handy for each step of the way.
 

The following two photos are my items I put through the acid  dye baths while they were still wet; I included some identification marks so I could remember which ones the pieces came from.  I really liked 4 D,E,F colors.  Notice the 3C and 3 E created a pink color, instead of red, I think it is because of the poly in both those trims.


And the following photos are my laces, bias tape, cording, rattail, and fabrics all dried and ready for the iron or to use as is.


One thing I struggled with was keeping my rubber gloves clean enough to not stain the pieces with dyes that I didn't want that color on, if you look closely at the bias tap and the silk ribbon a few areas have been over-dyed :)  

My other problem was I ended up with no green colors.   I think the filtering of the dye, although no speckling of fabrics, it did mean less pigment, so my yellow blue combo was more of a blue than green.  

The other thing I noticed on my silk ribbon, I dyed one in the primary blue and one in the filtered blue and they are both different colors; one is a deep blue/purple and the other is a very pretty lavender - the last two ribbons in the second column of my silk ribbon rows.

I was so happy to find the poly lace took the dye (Pink Lace) and the rattail cord also a poly/rayon took the dye as well, not to mention how excited I was to find the bias tapes I can now have in whatever color I can create!  

I am now ready to go on to the next assignment.  And another time I will play with my other powdered dyes.
 

Thank you Kathy, had loads of fun, learned so much, and now have a bounty of pretty colors to use in my next projects.

Thursday, April 30, 2015

2015 FMQC April Pillow

2015 April Pillow Challenge
 
 
All month I have been thinking about this FMQ Pattern by Christina Cameli called Peas in a Pod.   Every time I looked at the pattern I kept thinking fish bubbles, hmmm, wonder if my two little grandsons have anything to do with that  thinking :)
 
 
Anyway, the search was on for a snippet of fish fabric; and so happy to have found this one in my stash, it is almost like a satin/poly that washes well, which is important as I am using this months challenge to make another bed pillow, and now that the granddaughters are completed earlier in the challenges this year, this pillow will be for a grandson :)   All 4 of the grandchildren are under 5 so it is nice to have a pillow for each of them at Mimi's that is just their size.
 
 
I used the fish in the fabric for inspiration to design some fish in FMQ within the quilted pattern.
 
Thank you Christina, and Thank you Quilt Shop Gal, I am grateful for the monthly challenge that keeps me focusing on improving my skills, as life can get pretty busy and easy to let go of the fun stuff.


THought you might also like to see an update on last months challenge, I put a braid trim around the daisy and like it so much better.
 
Love when the camera strap makes its way into the photo :)


Tuesday, April 28, 2015

2015 April CQJP Block

Spring has arrived and although there has been snow falling occasionally, you will notice there are NO snowflakes embroidered on this months block.  Springtime in New England has arrived, and with the melting of the snow is the bursting through the hardened ground daffodils, crocuses, and other beautiful (bulb) flowers.   A pair of owl have been heard as they hooted their way through the tree tops in our neighborhood.

Therefore, this months block is a cheerful yellow color, with a button flower center, and once my silk ribbon arrives, it shall soon have a stem and leaves :)   The butterflies are twirling their way around the block seeking a resting spot among the beautiful buds in bloom.


my block for April indoor photo                                 Outdoor photo with updates  (updated May 4)
 
I used my first bits of hand dyed silk ribbon on this yellow button flower in the center of my block for the CQJP.   I am so happy with how this block is coming out.  The applique pieces I added beadwork too over the weekend as Kathy Shaw showed us how to spruce up your applique pieces.  I so enjoyed the added sparkle I finished the butterfly trail in beads, and then filled in the seam embellishment where the chick is, those lazy daisies, with beads.  As I write I think some little beads tossed around the chicks feet to look like grain will be a good idea to include on the block.
  

Tuesday, April 21, 2015

April CQ Class, Dyeing Lace

April Crazy quilt Class with Kathy Shaw has been so much fun.   This time our class is on an adventure in dyeing, and the medium is acrylic paint and rubbing alcohol ~ how much fun is that :)
 
So I put paint in little cups


Added the rubbing alcohol and stirred


Separated the liquid from the sludge, and now ready to paint Lace.


I then painted the carousel horses and this cotton cording. 

 
Here is a closeup of some of the horses as I was playing with different colors as I thinned out the colors further


Sunday, March 29, 2015

2015 March CQJP Block

March Crazy Quilt Journal Project...

Learning a new-to-me type of hand quilting these past couple of years has been both fun and challenging.   In the recent past most of my quilting has been by machine, as I am especially drawn to free motion quilting.  Having said that, there is something unique about hand stitchery that I am drawn to it.  Even though it takes longer to complete and does not supply instant gratification by any means, there is still something very desirable in the art form.  The holding the project close, the touch of the fiber in hand, the needle and thread passing through fabric,  pondering what to do next or which thread to use, not to mention color.

I have been taking classes from Kathy Shaw ~ she is one special lady, teaching numerous students the different skills of crazy quilting, and yes, it is over the internet.  She holds classes where there may be over 100 students in a class all the while multiples classes are going on at the same time.  Not only is she super organized, but personally responds to each person's project, not only giving encouragement but criticism constructively where needed, while providing inspiration and further instruction.  Oh, did I mention her classes are "FREE".  I know, in this day and age ?  Yes, she desires to share what she knows and has loved with this next generation of crazy quilters.  Students are not only beginners like myself, but some are quite experienced crazy quilters where there is much inspiration to be had as you blog your journey through the classes.  You can find a link to the 2015 Crazy Quilt Journal Project blog on the sidebar.   Here is a link to Kathy's blog:  http://www.shawkl.com/

Here is my March block for the 2015 CQJP


 Further thoughts :
 
Maybe it is just the slow thoughtful pace of embroidering each stitch that allows the mind to rest or sort through ones thoughts that create this desire for hand stitching; I am not sure which it is, but crazy quilting is a quilting skill that allows for some silence in the midst of an American culture of busyness and noise, the noise of both sight and sound (even action) that interrupts the silent moments of our day constantly.   Silence can create an inward act of being still in spirit, allowing for personal refreshment of the soul, the mind to process ideas and work through challenges as one learns about herself, while still allowing time to pray adding peace and strength into the day as she creates. 

Hope you all have a wonderful Easter ~
 
Godspeed,
mary

Thursday, March 26, 2015

* Updated * 2015 FMQC March Pillow

****************  Updated  *****************
 
scroll down for the updates....

Our March Pillow Challenge was led this month by Patsy Thompson ~ Wow!  What a great teacher :)

This pillow I made for my daughter-in-love who loves Daisy Flowers, this tan fabric is a piece I had left from their wedding quilt I made 5 years ago this year.... I made the center flower out of wool felt using free motion quilting using Patsy's trapunto directions.  Next I attached the completed flower to the center of the pillow, added more Free Motion Quilting to the flower including the 3 layer pillow top of fabric, batt and backing.  I then did more free motion quilting, this time on the pillow front creating borders on point around the flower, then I added feathers and fillers around the daisy.   I added some wiggle pattern inside one of the frames, and shells on the corner frames.  The final addition was straight line sewing to fill the corners.

Thank you Patsy for all your encouragement, I enjoy your DVD's you graciously shared with me as a prize from the 2012 challenge, as well as your website and these tutorials you do!   I love your book.  Thank you Patsy!

 
Updated the flower and put a trim around that I think gives such a nice finish!
 
Made changes to my pillow front adding trim around the flower and stippling around shells in corner


And now some photos of the back of my pillow before the pillow form was inserted... I followed Leah Days tutorial in February for the back with one exception, I put the buttonhole band on the bottom piece and the buttons on the inside of the top piece, as I did not want the buttons to detract from the back or be uncomfortable if anyone should lay on the back of the pillow...

This is the pillow cover inside-out so that you see the lining,
I stitched the top and bottom seams of the pillow front and back together
 notice that the placement of buttonhole strip lies on top of the pillow back top
then the side seams are stitched. 


This is the back of the pillow right sides out.
Note the three buttons are stitched on the inside of the top of the pillow back

 
This cover is now removable for washing in cold to warm water with no dryer (wool felt flower)
 

Thank you Darlene, these challenges do make me "Stop" being busy and cause me to make time to quilt when so many other things that I enjoy are competing for my time. Loads of fun and inspiration as well as learning skills that have challenged me :)